
In hot weather, a person seeks a stream of cool, fresh air, especially indoors when work is intense. The fan doesn’t help, it just circulates the same hot air back and forth. An air conditioner would help, but you can’t install them in all corners, it’s expensive. And in this case, ingenuity helps out: after all, you can make an air conditioner with your own hands. There are many options, you just need skillful hands.
Operating principles of a traditional air conditioner
In full accordance with the laws of physics, any liquid absorbs heat when evaporating. In a kettle, water turns into steam because it takes heat from the gas stove, in a puddle, water is heated by the sun and evaporates, a wet sheet on a rope gives off its heat, and the sheet dries and cools. So, both in the refrigerator and in the household air conditioner there is a certain container – an evaporator, filled with a special liquid – a refrigerant.

The refrigerant, evaporating, turns into cold vapor, passes through the pipeline (coil) along the path prescribed by the engineers, cools everything along the way, heats itself, and turns back into liquid. And so on ad infinitum. If this happens in an air conditioner, then the fan drives room air through the coil and the air cools and enters the room in this form. And the people in the room feel cool and pleasant.
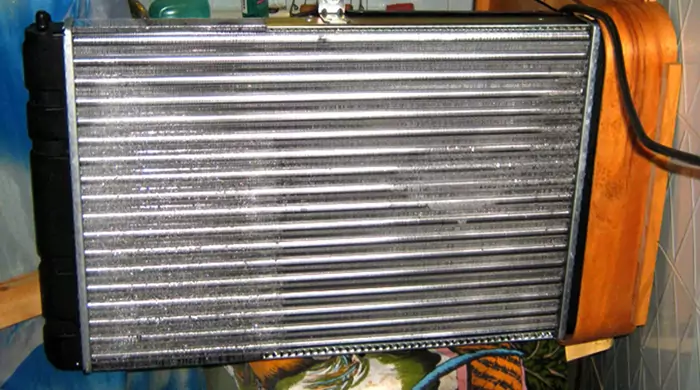
Homemade air conditioner from a car radiator
No wonder there is a saying “The need for invention is cunning!” If you don’t have money for a branded split system, you’ll have to provide comfort yourself.
What you need for work
Everything you need for work can be found in the garages of fellow car enthusiasts or the nearest auto stores. Any radiator is suitable, but preferably a larger one than that of the Oka. Automation is not needed. You will also need a car radiator fan with a rated electric motor supply voltage of 12 Volts.
For the fan you will need a casing and some fasteners, and for a complete set you will also need reinforced rubber tubes, a set of clamps (4 pieces) matched to the diameters of the tubes, inexpensive sealant, insulating tape, a connector for connecting voltage to the fan, a power supply from a computer at 230 W with a DC output and a voltage of 12 Volts.
Assembling the device
Rubber tubes connect the radiator to the cold water supply and the drain into the sewer. The water supply is from below, and the return (wastewater) is connected from above. A single structure of a radiator and a fan is assembled and installed in a convenient location. Such a device can serve one small room.
How to make an air conditioner from an old refrigerator
In order to make an air conditioner, it is not necessary to disassemble a car, even an old one. You can turn an old refrigerator into an air conditioner. But something in it should still work. Such a modification will bring a lot of benefits to the owner of the former refrigerator. Firstly, he will get air conditioning. Not very beautiful, but it works and is almost free. No need to go out and buy a new one and spend a lot of money. There is no need to regularly buy replacement filters for this air conditioner. And how nice it will be to enjoy the fruits of your labor!
Tools and materials
First of all, you will need an old refrigerator, which was not scrapped, and two small fans. The tools you need are a household electric jigsaw. You will also need a corrugated sewer pipe, polyurethane foam, or special insulation.
A hole is made in the refrigerator body, and a corrugated pipe is inserted into it tightly without gaps. All cracks are covered with polyurethane foam. The pipe comes out of the refrigerator body and leads to where cold air is needed.
Homemade air conditioner from a floor fan and plastic bottles
A good floor fan can serve several bottles of ice at once.
What do you need for work?
To operate, you need a fan, empty plastic bottles, and a freezer to produce enough ice.
Manufacturing of cooling device
An effective air conditioner still requires the use of a fan. You can use a small tabletop or a large floor-standing one. They have the same air-cooling principle, but the flow of cooled air will be different.
The idea of air cooling is the same in all variants; the dimensions of the unit and design solutions vary. The idea is that a fan blows air through an installed group of plastic bottles filled with ice. The more bottles and the larger their volume, the greater the mass of cooling ice and the colder the air passing through the “ice system” will be. Just don’t place the bottles close to one another; you need to maintain gaps of 2–3 cm.
A small table fan placed in front of a group of ice-filled 1.5-liter bottles will save one person from the heat. A large floor fan can blow air over a group of several 5-liter bottles. The flow of cooled air will be more powerful. The main thing is to freeze plenty of ice in advance and refresh the contents of the bottles. Ice bottles can be secured to the floor fan grill, but in such a way that they can be easily changed.
When working with such a cooler, it is necessary to take into account one thermal technical point. Condensation will form on the cold surface of the bottles and drain onto the floor. Therefore, it is necessary to take measures against flooding of the room, for example, place a thick rag and squeeze it out from time to time.
Mini air conditioner made from a table fan and a cardboard box
This is an option for cases when there are no resources other than an empty pan and a large cardboard box. Yes, you also need to have a sense of humor, because the product will be very funny.
Materials and tools
You need an empty pan with a capacity of 2-3 or 5 liters – the more the better. The fan should preferably have a diameter equal to the diameter of the pan. You will also need a sharp knife and stationery (or similar) glue. And deft hands.
Description of the operations performed
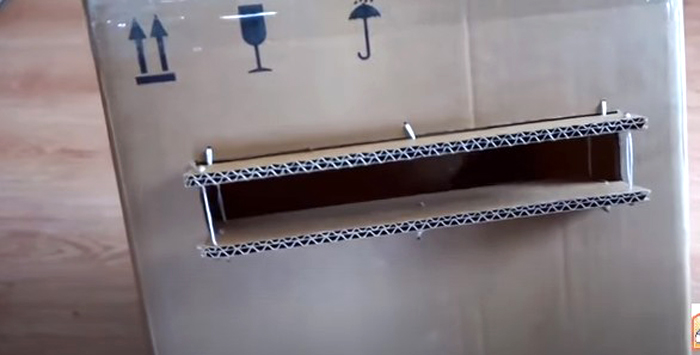
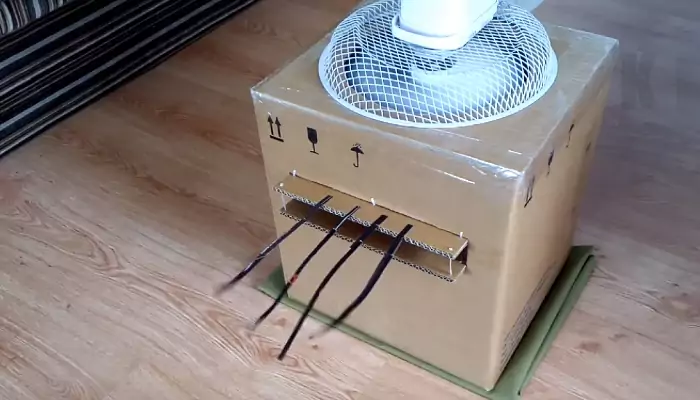
The box is carefully taped along all folds (for example, with tape) so that it does not fall apart during operation. Before this, a round window is cut out in the upper plane, equal in diameter to the pan. The pan itself should be installed in the box so that it extends slightly out of this window. And there should not be any cracks left; they must be covered up. A rectangular horizontal window measuring about 3 x 10 cm is cut out in one of the side edges of the box. A pipe of approximately the same size must be glued here.
The pan is covered with a protective grille from the fan, and lump ice is poured into the grille. A fan is attached to the top. The conditioner from the pan with the box is ready. Melting ice will drip into the pan. Tapes are glued to the pipe to monitor the operation of the unit and control the direction of airflow.
How to assemble a water cooling unit yourself
Craftsmen design and manufacture cooling systems for a variety of reasons. Firstly, in the July heat you want to sit in a cool room, and not in a gas chamber. Secondly, not everyone can afford to buy a branded split system. Along with installation, this is a very expensive pleasure. Thirdly, there are still people in the world who love and know how to make useful things with their own hands. And, most importantly, they make them from everything that comes to hand.
Tools and elements for creating a flow-through cooling system
As a rule, the tools needed are those that are available in every home. Especially where the craftsman lives. The tools are ordinary since you have to work with plastic, cardboard, and thin sheet iron. It is enough to own a sharp knife, metal scissors, a hammer, and pliers. An electric drill and a soldering iron will not hurt. Of course, it’s good to have a personal workbench with a bench vice. You also need glue and sealant. The starting material will be plastic bottles, a fan, and a plywood board.
Cooler assembly procedure
From plastic bottles, or rather, from their upper parts, where the neck is located, you can make an air conditioner that does not need a fan or electricity at all. You need to collect 20–30 plastic bottles, cut off 10–12 cm from the top, and mount them on a plywood panel.
Plastic bottle caps also come in handy. The flat part is cut off from the corks and the cork is used as a nut. It is screwed onto the neck of the bottle from the back of the plywood sheet. The shield must have the dimensions of the window into which this miracle device will be built.
Conclusion
Working on homemade products gives a person a double benefit: he creates something useful for the home and feels satisfaction from the process of work itself. It is good and useful to involve children, especially boys, in such activities. Otherwise, all they can do is press keys.